

Stoic Ice Bath How To & Maintenance
How-To and Setup Guide for the Stoic Ice Bath
Getting Started
The Stoic Ice Bath is designed for optimal recovery, performance, and wellness. Follow this guide for setup, operation, maintenance, and troubleshooting to ensure a seamless cold therapy experience.
Stoic Ice Bath Tub Setup Video
Setup Instructions
1. Unboxing & Placement
Remove the Stoic Tub and Chiller from the packaging.
Place the tub on a flat, smooth surface free of sharp objects.
Ensure the chiller is in a well-ventilated space (indoors or shaded outdoors).
Keep the chiller fan at least 500mm from walls for airflow.
2. Inflating the Tub
Attach the Double Action Hand Pump to the grey Inflation Port.
Inflate to a maximum of 10 PSI.
Remove the pump and secure the Inflation Valve Cap.
3. Connecting the Chiller
Remove the white protective caps from the Chiller Inlet and Outlet.
Attach the hoses to the chiller, ensuring O-rings are in place.
Secure the L-Valves into the tub’s Inlet and Outlet points (hand-tighten only).
Fit a Valve Fitting to each L-Valve, using plumber’s tape to prevent leaks.
Attach the hoses (Red to Red, Green to Green).
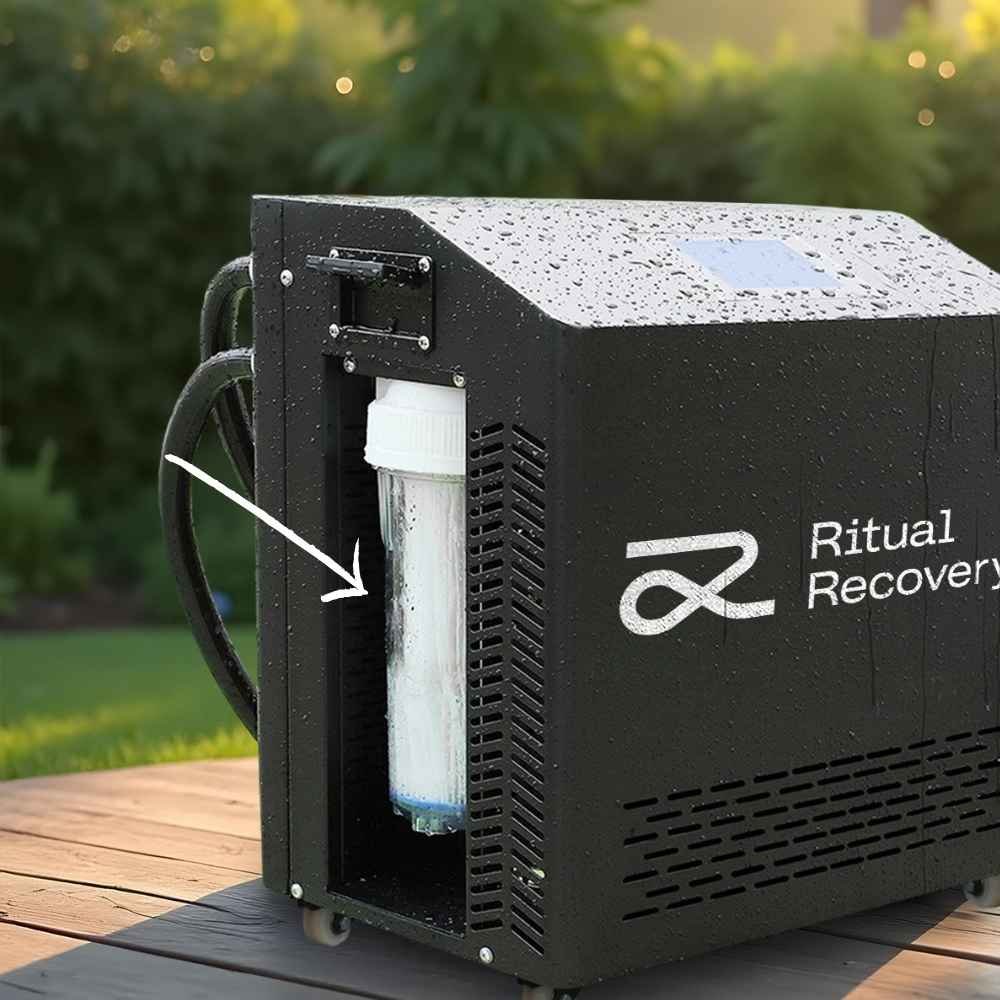
4. Installing the Filter
Unscrew the Filter Canister (turn counterclockwise).
Insert the Washable 20-Micron Pleated Filter.
Fill the canister with water before securing it back (hand-tighten only).
5. Filling the Tub
Fill the Stoic Tub just below the Max Water Line.
6. Powering On & Temperature Setup
Turn on the chiller and test the RCD switch (press the orange Test Button to ensure power isolation).
If the RCD does not isolate power, do not use the chiller—contact support.
Adjust the temperature manually using the + / - buttons on the display.
Cover the tub and allow it to chill or heat to the desired temperature.
7. Connecting the Tuya App
Download the Tuya Smart App.
Ensure your phone is connected to Wi-Fi.
Hold the Wi-Fi button on the chiller for 3-5 seconds to enable pairing mode.
Follow the in-app prompts to add your device (SY-ICE).
Pack Down Instructions
Turn Off Chiller:
Press the power button and switch off the rear power button.
Close the Valve Fittings:
Turn the valves to the closed (perpendicular) position.
Drain the Tub:
Method 1: Disconnect the red inlet hose, direct it to a drainage area, and open the valve.
Method 2: Use the chiller as a pump by placing one hose inside the tub and the other in a drain.
Method 3: Use a submersible pump.
Clean & Dry the Tub:
Wipe down with white vinegar or a natural cleaner.
Dry thoroughly before storage.
Deflate the Tub:
Remove the Inflation Valve and press the Valve Pin to release air.
Use the pump’s deflate mode for complete deflation.
Pack Away:
Fold the tub tightly with the pump inside.
Secure with the strap and place it in the carry bag.
Maintenance & Cleaning
To keep your Stoic Ice Bath running smoothly, follow these mandatory maintenance steps:
Daily Maintenance
✔ Pre-Plunge Hygiene: Always shower before use to prevent dirt, oils, and hair from clogging the filters.
✔ Skim Water: Use a spa skimming net after each use to remove debris.
Weekly Maintenance
✔ Wipe Down Surfaces: Use a soft sponge or cloth to remove build-up inside the tub.
✔ Water Chemistry Check:
Add 20ml Sanitiser, wait 15 min.
Add 5-10g Spa Shock (pre-dissolved in water), wait 15 min.
Use a Test Strip to check pH & alkalinity levels. Adjust if needed.
Shop our chlorine free products in our 6 Month Ice Bath Maintenance Kit.
Monthly Maintenance
✔ Clean the Inner Water Strainer:
Turn off the chiller.
Unscrew the Metal Filter and rinse under water.
✔ Replace the Water Filter:
If the filter is brown or clogged, replace it.
Always fill the filter canister with water before reinstalling.
If the flow rate is affected, replace paper filter.
✔ Check Water Flow Rate:
Flow rate should be 16-20L/min.
If lower, troubleshoot for blockages.
Warranty & Support
Tub: 1-year warranty
Chiller: 1-year warranty
Support Email: hello@myritual.com.au
Need help? Contact us with a video of the chiller display and tub setup via WeTransfer for faster assistance.
This guide ensures optimal setup, usage, and longevity of your Stoic Ice Bath. For more instructional videos, check your post-purchase email.
Replacing The Paper Filter
Regularly changing the 20-micron pleated paper filter is essential to maintaining water quality and ensuring your chiller runs smoothly. Over time, debris, skin particles, and organic material can clog the filter, reducing water flow and putting unnecessary strain on the system.
How to Change the Paper Water Filter on Your Stoic Ice Bath
The 20-micron paper filter is one of the cornerstones of keeping your ice bath water clean and your chiller running optimally. The changing of the paper filter is Mandatory and is part of the Mandatory Maintenance outline in your product manual. Not changing the paper filter regularly, and using the ice bath with compromised flow rate constitutes misuse of the product and voids Warranty.
When to Change the Filter
Check the filter weekly for discolouration or debris.
Replace the filter monthly with normal use, or weekly or sooner if used frequently such as in high traffic spaces.
If the water flow rate drops consistently below 15L/min, check for a clogged filter.
Steps to Change the Filter
Turn Off the Chiller:
Press the power button on the chiller display.
Switch off the rear power button for safety.
Close the Valve Fittings:
Turn both valve fittings to the closed (perpendicular) position to prevent water loss.
Remove the Filter Canister:
Unscrew the filter canister (turn counterclockwise).
If it's too tight, use the provided plastic wrench (do not overtighten when reinstalling).
Remove the Old Filter:
Take out the paper filter and inspect it.
If it's brown, clogged, or discolored, replace it with a new filter.
Install the New Filter:
Place a fresh 20-micron paper filter inside the canister.
Fill the canister with water before reinstalling (this prevents air pockets that can disrupt water flow).
Reattach the Filter Canister:
Screw the canister back into place (clockwise), ensuring the filter sits centered inside.
Tighten hand-tight only—over-tightening can damage the canister or restrict water flow.
Open the Valve Fittings:
Turn both valves to the open (parallel) position before restarting the chiller.
Power On & Test:
Turn on the chiller and check that the water flow rate is within the 18-20L/min range.
If the water flow is still low, check the Inner Water Strainer for debris.
Pro Tips for Extending Filter Life
✔ Always shower before plunging to reduce debris buildup.
✔ Use a spa skimming net after each use to remove hair and particles.
✔ Regularly check and clean the Inner Water Strainer to keep water flowing efficiently.
✔ Cover the ice bath with the lid in between use to keep out dirt, debris and unwanted particles.
By maintaining a clean and functional filter, your Stoic Ice Bath will stay in peak condition, providing the best possible recovery experience.
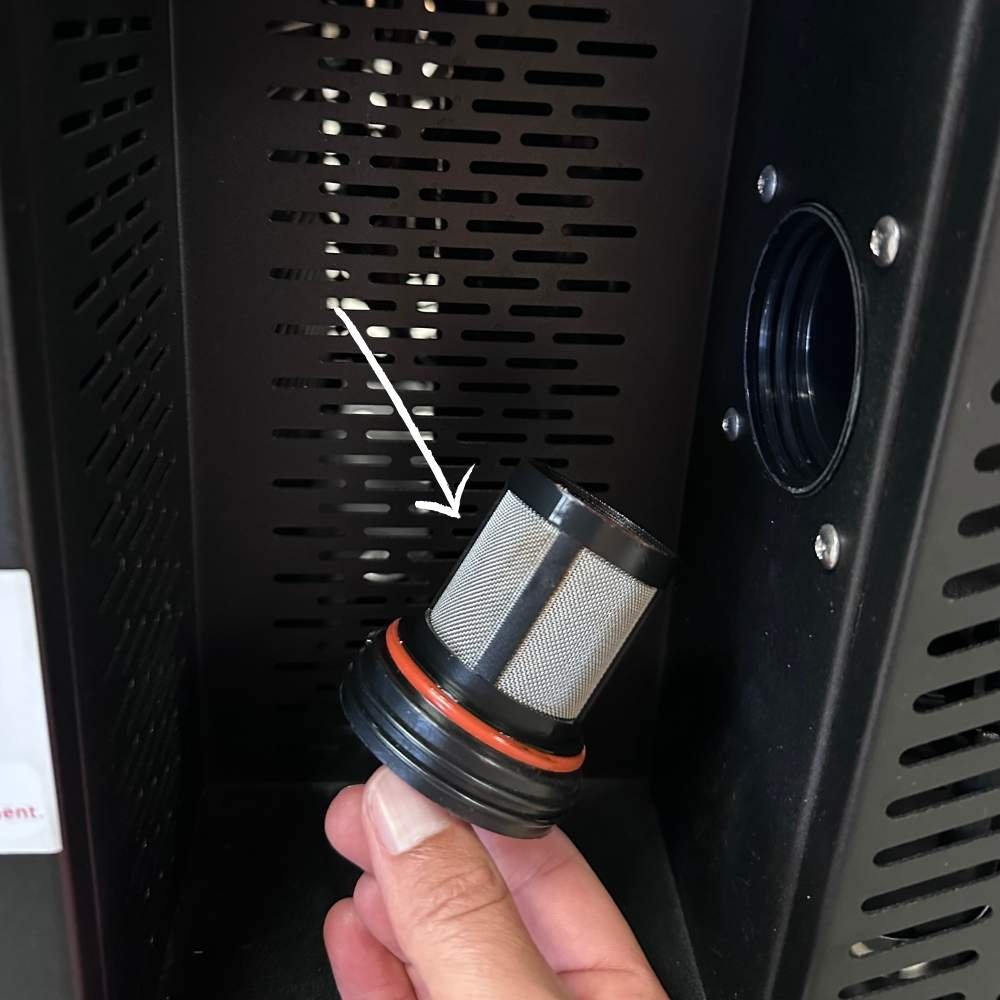
Cleaning The Internal Metal Filter
The Internal Metal Filter (Inner Water Strainer) is a crucial component that prevents debris from entering the chiller system. Regular maintenance ensures optimal water flow and protects the chiller from blockages or strain.
How to Clean the Internal Metal Filter on Your Stoic Ice Bath
The Internal Metal Filter (Inner Water Strainer) is a crucial component that prevents debris from entering the chiller system. Regular maintenance ensures optimal water flow and protects the chiller from blockages or strain.
When to Clean the Internal Metal Filter
At least once a month for regular use.
Every 1-2 weeks for high-use settings (e.g., multiple daily plunges).
If the water flow rate drops below 18-20L/min, inspect and clean the filter.
Steps to Clean the Internal Metal Filter
Turn Off the Chiller:
Press the power button on the display.
Switch off the rear power button to disconnect power.
Allow the Chiller to Cool:
If the chiller has been running, wait 10-15 minutes before handling internal components.
Close the Valve Fittings:
Turn both valves to the closed (perpendicular) position to stop water flow.
Access the Filter:
Unscrew the Filter Canister (turn counterclockwise).
Locate the metal filter inside the chiller (it sits within the filter housing).
If you have the newer model of chiller, you do not need to remove the paper filter canister, your metal filter housing will be at the rear of the chiller.
Remove the Metal Filter:
Use the wrench tool (provided) to unscrew the Inner Water Strainer (turn counterclockwise).
Clean the Filter:
Rinse the metal filter under running water to remove debris.
Use a soft brush or sponge to gently scrub away stubborn dirt.
Avoid using harsh chemicals—warm water and mild soap are sufficient.
Reinstall the Filter:
Place the clean metal filter back into the housing (make sure there is an o-ring present around the filter housing).
Tighten clockwise lightly with the wrench, but do not over-tighten.
Reassemble the Filter Canister:
Screw the Filter Canister back into its slot (hand-tight only).
Ensure the paper filter is properly installed and not crushed.
Open the Valve Fittings:
Turn the valves back to the open (parallel) position before restarting the chiller.
Power On & Test:
Turn on the chiller and check the water flow rate on the display.
If flow is still low, check for air pockets by refilling the filter canister with water before reinstalling.
Pro Tips for Keeping Your Metal Filter in Top Condition
✔ Always remove rinse after heavy use to prevent buildup of hair, sand, or skin particles.
✔ If water flow drops, check both the metal and paper filters—a clogged filter is the #1 cause of reduced performance.
✔ Use a skimming net after each use to catch debris before it reaches the filter.
By maintaining a clean Internal Metal Filter, your Stoic Ice Bath will continue to provide powerful, uninterrupted cooling, ensuring the best recovery experience. 🚀❄️
Stoic Ice Bath FAQ’s
This guide covers all common questions, troubleshooting tips, and best practices to ensure your Stoic Ice Bath and Chiller function at peak performance.
-
The cooling time depends on water volume, ambient temperature, and starting temperature:
200L of water: Reaches 4°C in ~2.5-4.2 hours
500L of water: Reaches 4°C in ~4.1-6.9 hours
Keeping the insulated cover on speeds up cooling.
-
✔ Yes, but it must be shaded and ventilated. Avoid direct sunlight as it affects performance.
✔ Ensure 500mm clearance around the chiller for airflow.
✔ Never submerge or spray the chiller with water. -
✔ Fill the tub just below the max fill line. Overfilling may cause overflow when you enter.
✔ Leave space to allow for body displacement. -
✔ Yes, but it’s not required. The chiller cools water independently.
✔ If using ice, the chiller will maintain the temperature without excessive cycling. -
✔ Yes, but you should replace or filter the water more frequently.
✔ Regular water chemistry checks are recommended. -
✔ Yes, the chiller is designed for continuous operation.
✔ Ensure proper ventilation and regular maintenance to prevent strain. -
✔ Every 2-4 weeks with proper sanitation.
✔ If used multiple times per day, consider weekly water changes.
✔ If water looks dirty or smells, it’s time for a change. -
✔ Yes, but only certain chemicals can be used. We recommend chlorine free products:
Sanitiser (20ml per fill)
Spa Shock (5-10g, pre-dissolved)
pH Balancer as needed
✔ Do not use bleach, bromine or harsh pool chemicals.
Buy our chlorine free ice bath products here.
-
✔ Yes! The chiller can heat water up to 42°C for hot therapy sessions.
✔ Switch between cooling and heating using the Tuya App or control panel. -
✔ Check power supply & circuit breaker.
✔ Test the RCD switch (press the orange test button).
✔ Ensure the rear power button is on.
✔ If the issue persists, contact support. -
✔ Ensure 500mm clearance around the chiller for ventilation.
✔ Check for blockages in the fan or vents.
✔ If noises persist, inspect the water filter and hoses for flow issues. -
✔ Ensure adequate airflow—do not cover vents.
✔ Do not operate in ambient temperatures above 40°C.
✔ If overheating persists, turn off and allow the chiller to cool down before restarting. -
✔ Check if valves are fully open (parallel position).
✔ Clean or replace the paper filter.
✔ Clean the metal strainer inside the chiller.
✔ Check for air bubbles in the system by refilling the filter canister.✔ Make sure there is an o-ring present in each hose end. Replace if missing or damaged.
-
✔ Ensure the Inflation Valve Pin is not depressed when inflating.
✔ Check for temperature-related air fluctuations.
✔ Use soapy water to detect slow leaks and patch with repair kit if needed. -
✔ Open the valve fitting fully and disconnect the red hose to direct water out.
✔ Use a submersible pump for faster draining.
✔ Tip the tub to remove excess water. -
✔ Use a 2.4GHz network (the chiller does not support 5GHz networks).
✔ Hold the Wi-Fi button for 3-5 seconds to activate pairing mode.
✔ Ensure the Tuya Smart App is installed and your phone is on the same Wi-Fi network as the chiller.
✔ Keep the chiller close to the Wi-Fi router to ensure a strong signal. If it's too far, the connection may fail.
✔ Double-check the Wi-Fi password entered during pairing.
✔ Restart the router if connection issues persist. -
✔ Replace the paper filter if clogged or discoloured.
✔ Add sanitiser (20ml) and Spa Shock (5-10g, pre-dissolved), then wait 15 minutes.
✔ Skim out debris with a spa net to remove hair and particles.
✔ Check water chemistry using a test strip and adjust pH & alkalinity if needed.
✔ Wipe down the tub surfaces with white vinegar or a natural cleaner.
✔ Empty and refill the tub with fresh water if cloudiness persists despite treatment.You can also watch this video for more details on How To Keep Your Ice Bath Water Clean.
-
✔ Keep the insulated cover on when not in use.
✔ Check if the chiller fan is obstructed or in direct sunlight.
✔ Ensure water flow rate is 16-20L/min—if low, clean the filters.Read more here about how the outside ambient temperature and other factors can influence the cooling efficiency of your ice bath.
Still Need Help?
📧 Email: hello@myritual.com.au or fill out the contact form below.
📸 For faster support, send a video via WeTransfer showing:
✅ Chiller display screen on startup and while priming to show flow rate
✅ Show the chiller filter canister while running
✅ Inside the tub to show water flow, including showing correct hose routing
✅ Any problem areas
✅ The Chiller Serial Number sticker