

Roman Ice Bath How To & Maintenance
How-To and Setup Guide for The Roman Ice Bath
The Roman Ice Bath is designed for optimal recovery, performance, and wellness. Follow this guide for setup, operation, maintenance, and troubleshooting to ensure a seamless cold therapy experience.
Setup Instructions
1. Unboxing & Placement
Unbox your Roman Tub and Chiller, removing all packaging.
Place the chiller on a flat, stable surface in a shaded and ventilated location.
Maintain 500mm clearance from the chiller’s fan to walls or obstructions for proper airflow.
If using the Timber Housing Step, slide it over the chiller before attaching hoses, ensuring you protect the chiller display screen.
2. Connecting the Chiller
✔ Remove protective caps from the chiller’s inlet (red) and outlet (green) ports.
✔ Attach one chiller hose to each port, ensuring O-rings are in place to prevent leaks (hand-tighten only).
✔ Wrap plumber’s tape neatly around the threaded parts of the tub inlet and outlet ports before screwing the metal connectors on firmly hand tight.
✔ Connect the hoses to the tub inlet and outlet:
Green hose (outlet) → Connect to upper inlet port on the tub.
Red hose (inlet) → Connect to lower outlet port on the tub.
✔ Test water flow direction by running the chiller briefly. Water should flow into the top inlet and suction from the bottom outlet.
3. Installing the Paper Water Filter
✔ Turn off the chiller before installing the filter.
✔ Unscrew (counterclockwise) the Filter Canister from the chiller.
✔ Insert a fresh 20-micron pleated paper filter inside the canister.
✔ Fill the canister with water before reinstalling (prevents airlocks).
✔ Hand-tighten only—do not overtighten with the wrench.
4. Filling the Tub
✔ Fill the Roman Tub just above the tub’s inlet port or to a comfortable level. Ensure the drain outlet at the rear is in the closed position before filling!
✔ Ensure no overfilling to avoid water spillage.
✔ Check all hose connections for leaks while filling.
5. Powering On & Setting the Temperature
✔ Ensure the red isolation valve at the rear of the tub is in the open (parallel) position.
✔ Power on the chiller by pressing the display power button, then turning on the rear power switch.
✔ Test the RCD switch:
Press the orange “Test” button to check for power isolation.
If the RCD does not isolate power, do not use the chiller—contact support.
✔ Set the target temperature using the + / - buttons on the chiller display.
✔ If the display is locked, hold the lock button for 5 seconds to unlock it.
✔ Cover the tub with the insulated cover and allow time for chilling or heating.
6. Connecting to the Tuya App
✔ Download the Tuya Smart App on iOS or Android.
✔ Ensure your phone is connected to Wi-Fi (2.4GHz only, not 5GHz).
✔ Hold the Wi-Fi button for 3-5 seconds until the Wi-Fi symbol blinks, activating pairing mode.
✔ Open the Tuya App and add your device (SY-ICE).
✔ Follow the in-app prompts to complete setup.
Pack Down Instructions
1. Turning Off & Disconnecting
✔ Press the power button on the chiller display to turn off.
✔ Switch off the rear power button for safety.
2. Closing the Valves
✔ Turn the Valve Fittings to the closed (perpendicular) position before disconnecting hoses.
3. Draining the Tub
There are four ways to drain the tub:
✅ Method 1 (Using Garden Hose Attachment)
Connect a garden hose to the tub drain valve.
Direct the hose to a drain or garden.
Open the drain valve at the rear of the tub to the parallel position before popping open the internal tub drainage valve to release water
✅ Method 2 (Using the Chiller as a Pump)
Close both valve fittings.
Disconnect both hoses from the tub inlet and outlet.
Place the red hose inside the tub and the green hose in the drainage area.
Turn on the chiller briefly to pump out water (do not allow air to enter).
✅ Method 3 (Direct Hose Drainage)
Disconnect the red “In” hose from the chiller.
Direct the hose to a drain or garden.
Open the valve fitting at the tub to release water.
✅ Method 4 (Using a Submersible Pump)
Place a submersible sump pump inside the tub for fast drainage.
4. Cleaning & Drying the Tub
✔ Spray the stainless steel interior with diluted white vinegar or a natural cleaner.
✔ Wipe down with a soft towel to remove excess solution.
✔ Dry thoroughly before storing or refilling.
Maintenance & Cleaning
Daily Maintenance
✔ Shower before plunging to remove dirt, oils, and hair.
✔ Skim water after each use to remove debris.
Weekly Maintenance
✔ Wipe down the tub’s surfaces with a sponge or soft cloth.
✔ Check water chemistry:
Add 20ml Sanitiser and wait 15 minutes.
Add 5-10g Spa Shock (pre-dissolved in water) and wait 15 minutes.
Test pH & alkalinity levels using test strips.
Monthly Maintenance
✔ Clean the Inner Water Strainer (Metal Filter):
Turn off the chiller.
Remove the filter canister and unscrew the metal filter.
Rinse under water to remove debris.
✔ Replace the Paper Water Filter:
If filter is brown or clogged, replace it.
Fill the filter canister with water before reinstalling.
✔ Check Water Flow Rate:
Flow rate should be 16-20L/min.
If consistently lower, check for blockages and filter cleanliness.
Warranty & Support
Tub: 2-year warranty
Chiller: 1-year warranty
Support Email: hello@myritual.com.au
📸 For faster support, send a video via WeTransfer showing:
✅ Chiller display screen to show startup
✅ Inside the tub to show water flow
✅ Chiller hose connections and tub connections
✅ Chiller Serial Number Sticker to show S/N
This guide ensures optimal setup, operation, and longevity of your Roman Ice Bath.

Replacing the Paper Filter
Regularly changing the 20-micron pleated paper filter is essential to maintaining water quality and ensuring your chiller runs smoothly. Over time, debris, skin particles, and organic material can clog the filter, reducing water flow and putting unnecessary strain on the system.
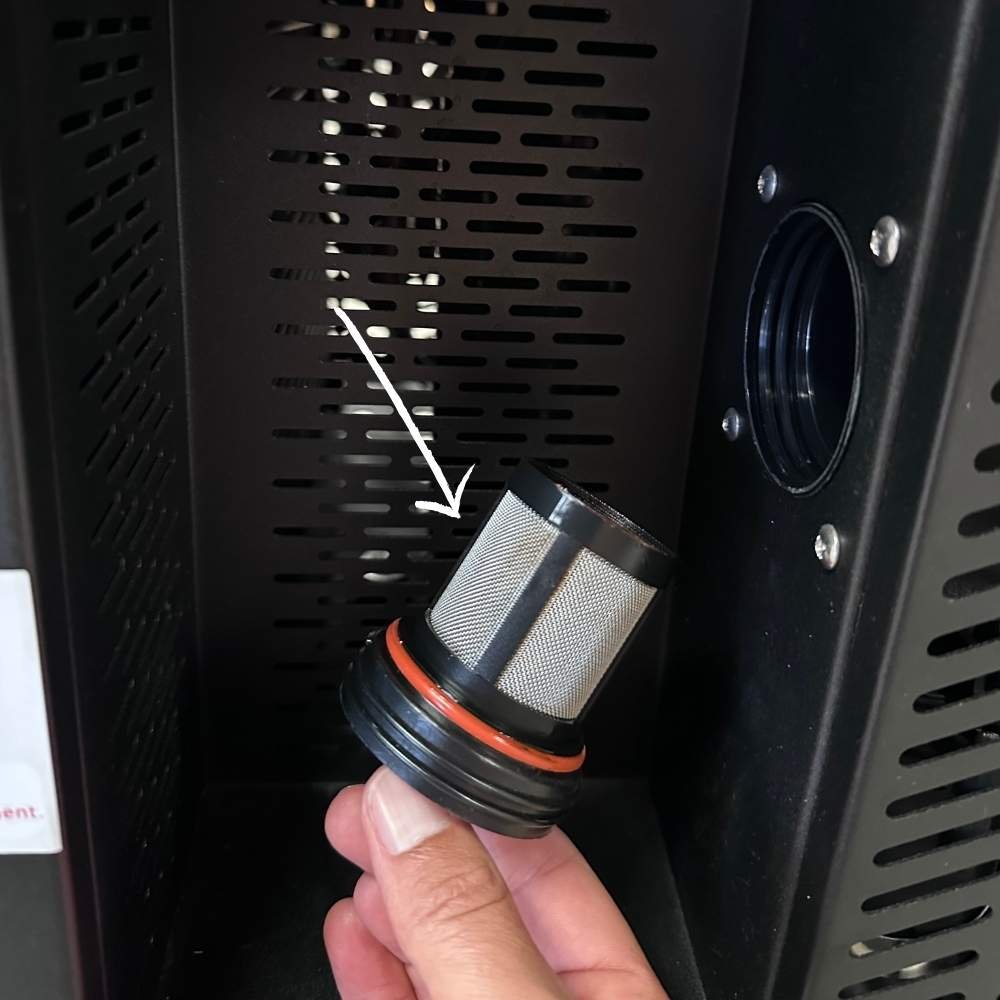
Cleaning the Internal Metal Filter
The Inner Water Strainer (Metal Filter) is essential for preventing debris from entering the chiller system. Regular cleaning ensures optimal water flow and prevents blockages that can strain the chiller.
Roman Ice Bath FAQs
-
The cooling time depends on the chiller model, water volume, ambient temperature, and starting temperature:
For 1HP Chiller (Standard Chiller)
200L of water: Cools to 4°C in approximately 4.2 hours
500L of water: Cools to 4°C in approximately 6.9 hours
For 2HP Chiller (Pro Chiller)
200L of water: Cools to 4°C in approximately 3.1 hours
500L of water: Cools to 4°C in approximately 5.5 hours
✔ Using the insulated cover helps maintain cold temperatures and speeds up cooling.
✔ The ambient temperature and starting water temperature can affect cooling times. -
✔ Yes, but ensure the chiller is shaded and well-ventilated.
✔ Avoid direct sunlight, as it affects performance.
✔ Maintain at least 500mm clearance around the chiller for airflow.
✔ Never submerge or spray the chiller with water. -
✔ Fill the tub just above the Tub Inlet Point for proper circulation.
✔ Avoid overfilling, as water displacement occurs when you enter. -
✔ Yes, but it’s not necessary. The chiller cools water independently.
✔ Adding ice can help speed up the initial cooling process, but the chiller maintains the temperature efficiently.
You can add some ice to the tub if you are hoping to aid the cooling speed when first refilling the tub with ambient temperature water.
-
✔ Yes, but water maintenance is crucial.
✔ More frequent use requires regular cleaning, filter replacements, and water chemistry checks. -
✔ Yes, the chiller is designed for continuous operation.
✔ Ensure proper ventilation and regular filter cleaning to prevent strain. -
✔ Every 2-4 weeks, depending on usage.
✔ If used multiple times per day, weekly water changes are recommended.
✔ If the water appears cloudy or has an odor, replace it immediately.
-
✔ Yes, but we strongly recommend using only our chlorine-free water treatment products to ensure optimal performance and longevity of your ice bath system.
✔ Our recommended water treatment routine includes:
Sanitiser: 20ml per fill
Spa Shock: 5-10g (pre-dissolved in water)
pH Adjusters as needed
🚫 Do NOT use chlorine, bleach, or harsh pool chemicals, as they can damage the chiller components and tub surfaces over time.
💧 For best results, use our specially formulated chlorine-free treatment products, available on our website.
-
✔ Yes! The chiller can heat water up to 42°C for contrast therapy.
✔ Switch between cooling and heating using the Tuya App or control panel. -
✔ Check the power supply & circuit breaker – Ensure the chiller is plugged into a functioning power outlet.
✔ Test the RCD switch – Press the orange “Test” button on the back of the chiller to check for power isolation. If the RCD does not isolate power, do not use the chiller—contact support.
✔ Ensure the rear power switch is ON – The red power switch on the chiller should be switched to the ON position.
✔ Check for circuit overload – Ensure that no other high-powered devices (such as heaters, fridges, or air conditioners) are being used on the same electrical circuit, as this may cause the circuit to trip. If the circuit is overloaded, try using a dedicated power outlet for the chiller.
✔ Inspect the power cord – Make sure the chiller’s power cable is undamaged and securely connected.
✔ Reset the circuit breaker – If the breaker has tripped, reset it and try turning the chiller back on.If the issue persists, contact support.
-
✔ Ensure proper ventilation – The chiller requires at least 500mm of clearance around the fan and vents to prevent overheating and excessive noise.
✔ Check for blockages in the fan or vents – Remove any dust, debris, or obstructions that could be causing noise.
✔ Inspect the water filters – A clogged or dirty filter can strain the system and cause unusual sounds.
✔ Ensure the filter is correctly placed – If the paper filter is crimped or incorrectly seated, it may restrict water flow and cause noise. Reinstall the filter, ensuring it sits centered and uncompressed inside the housing.
✔ Tighten all hose connections – Loose connections can cause air to enter the system, leading to vibration or gurgling noises.If the noise persists after these checks, contact support.
-
✔ Ensure valves are fully open (parallel position).
✔ Clean or replace the paper filter.
✔ Clean the metal strainer inside the chiller.
✔ Refill the Filter Canister with water to prevent airlocks. -
✔ Ensure your Wi-Fi network is 2.4GHz (the chiller does not support 5GHz).
✔ Hold the Wi-Fi button for 3-5 seconds to activate pairing mode.
✔ Use the Tuya Smart App and ensure your phone is on the same Wi-Fi network.
✔ Keep the chiller near the Wi-Fi router to ensure a strong signal. -
✔ Replace the paper filter if clogged or discoloured.
✔ Add sanitiser (20ml) and Spa Shock (5-10g, pre-dissolved), then wait 15 minutes.
✔ Skim out debris with a spa net.
✔ Check and adjust pH & alkalinity levels.
✔ Wipe down the tub with white vinegar or a natural cleaner.
✔ If cloudiness persists, empty and refill the tub with fresh water. -
✔ Ensure O-rings are properly seated – Each hose connection should have an O-ring in place to create a strong seal. If an O-ring is damaged or missing, replace it before reconnecting.
✔ Hand-tighten connections – Do not overtighten, as this can cause leaks or damage the fittings.
✔ Inspect hoses for cracks or wear – If hoses appear worn or damaged, replace them.
✔ Use plumber’s tape on tub inlet and outlet pipe threads – Before connecting the Metal Valve Fittings, wrap a thin, even layer of plumber’s tape around the tub inlet and outlet threads to prevent leaks. Ensure the tape is applied neatly and smoothly without bunching or gaps.
✔ Check for cross-threading – When connecting hoses and fittings, ensure threads align correctly to avoid leaks.If leaks persist, reapply plumber’s tape and inspect for damaged O-rings or fittings before reconnecting.
Still need help?
📧 Email: hello@myritual.com.au or fill out the contact form below.
📸 For faster support, send a video via WeTransfer showing:
✅ Chiller display screen on startup and while priming to show flow rate
✅ Show the chiller filter canister while running
✅ Inside the tub to show water flow, including showing correct hose routing
✅ Any problem areas
✅ The Chiller Serial Number sticker